Saturday 24 April 2010

Kepler

Another of my early lunar targets is Kepler and its near neighbours Marius and Reiner. Kepler is an impact crater located just above the equator on the west-side of the Moon (west of Copernicus).

Kepler has a pronounced ray system similar to that seen around other prominent craters such as Copernicus and Tycho. Ray systems are formed by radial streaks of ejecta thrown up during the formation of an impact crater. Larger chunks of ejecta can also form smaller secondary craters around the main impact site. Ray systems usually have a higher albedo (reflectivity) than the surrounding material so appear brighter.

Here is a picture of Kepler created from a 4 minute webcam video:


Kepler is the crater with the ray system in the top-right, Marius (top) and Reiner (bottom) are towards the left. Marius is another crater that has been flooded by basaltic lava leaving the interior flat and smooth with no central rise.

Friday 9 April 2010

Aristarchus

After getting plenty of practice on Mars, webcam astrophotography of the Moon is pretty easy - finding the target couldn't be easier and there are plenty of features to focus on.

My recent observing sessions have coincided with a near-full moon so my first lunar targets have been towards the edge of the disk. In this post I'll be looking at Aristarchus which is one of the best known lunar regions.

The Aristarchus crater is located in the north-west of the Moon at the south-east edge of the Aristarchus plateau. It is one of the brightest lunar features with an albedo of nearly double that of most other features. Next to Aristarchus is the slightly smaller crater Herodotus which is darker due to the crater floor being flooded with lava. Evidence of earlier volcanic activity is also seen in the prominent rille Vallis Schröteri which winds its way northwards from Herodotus.

This region is a satisfying target for astrophotography and here are a couple of images from my observing sessions on Feb 26th and March 27th 2010.


The brightness and depth of the features shows up well in both pictures, particularly the bottom picture which has a more prominent terminator and a slightly sharper angle of observation.

From a technical point of view, each picture is based on stacking the best 400 or so frames from a 4 minute video. I did very little processing the stacked image - simply increasing the contrast, decreasing the brightness and making a few small adjustments on the layers to strengthen some of the finer detail.

Saturday 3 April 2010

Registax Basics

As I mentioned earlier I use Registax to process my webcam videos. There are quite a lot of settings and controls which at first glance can be intimidating, but it's easy to use with a little practice.

The first major step is alignment. For my reference frame I try to pick a relatively high quality frame from the first 50 or so. Then comes the selection of alignment method. So far I've dealt with 2 types of target - planetary and lunar. For planetary videos I use centre of gravity alignment and drop the luminosity threshold to around 30%. This set-up means the alignment process will work for a target with few clear features that jumps around between frames, which is the case for targets such as Mars. For lunar videos I use a single, large alignment box (usually 256) centred on the most obvious feature in the reference frame. I have tried using multi-align but find that it rarely works. Since my videos are quite short (around 4 minutes) there should be little image rotation and I doubt multi-align would significantly improve my final image.

After alignment has completed the images need to be stacked. As a rule of thumb I aim to stack around 400 images which can be varied by changing the quality settings. For a good quality video the lowest quality should be around 95% of the reference frame.

The next few steps are straightforward until the final stage of adjusting wavelets and picture settings. This is something of a process of trial and error but there are some settings that work more often than others. The main controls are the 6 picture layers, the contrast and the brightness. Starting with the easy ones, I find that turning the contrast up (around 130) and brightness down (around -25) usually helps. The layer sliders enhance the detail in different parts of the image but if over-used can create an unnatural looking image. I find that enhancing layers 4 and 5 often has the best effect, usually picking values in the 10-30 range. Since it can be hard to decide on a 'best' image, I always create a set of images using a range of settings and then compare these side by side to pick my favourite.

All in all Registax is very easy to use and can turn a video into a crisp picture in about 15 minutes.

Friday 2 April 2010

Getting to Grips with Mars

After my first 2 practice sessions and compiling my top tips for webcam success, I had high hopes for some decent images. Add to this some excellent viewing conditions and Mars at opposition and I had everything in my favour.

I started with some preliminary videos without a Barlow while I was waiting for the telescope to cool and the sky to darken, but my plan was to spend the bulk of my observing time with using the 2x Barlow.

Now that I'd done this a few times it was fairly easy to get the target into the webcam field of view even when using the 2x Barlow. I spent 5 minutes or so getting the best focus that I could and recorded a 4 minute video. I repeated this another 3 times and once more with a 5x Barlow. It was much more difficult to track the target when using the 5x Barlow. Not only does it move across the field of view much quicker but it also accentuates the difference in responsiveness when tracking in altitude compared to azimuth. This in turn makes it much harder to focus the target. As a result I only managed to record 1 minute of material with the 5x Barlow.

Just looking at the raw videos it was obvious that I had some better quality images. A Registax processing session later and I had my first pictures of Mars that I am pleased with! As is the way with post-processing, the final image can look completely different depending on the chosen settings. Here are 2 of my favourite images from the videos using the 2x Barlow:


The polar ice caps and some of the darker upland regions are very clear in both images.

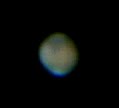
The video using the 5x Barlow wasn't as successful and it looks as though I didn't focus it well enough. Having said that, there is some detail and it's no worse than my early efforts with a webcam so hopefully I'll be able to crack it in the future. Here's the best of the high magnification images: